View basket (0 items $0.00)
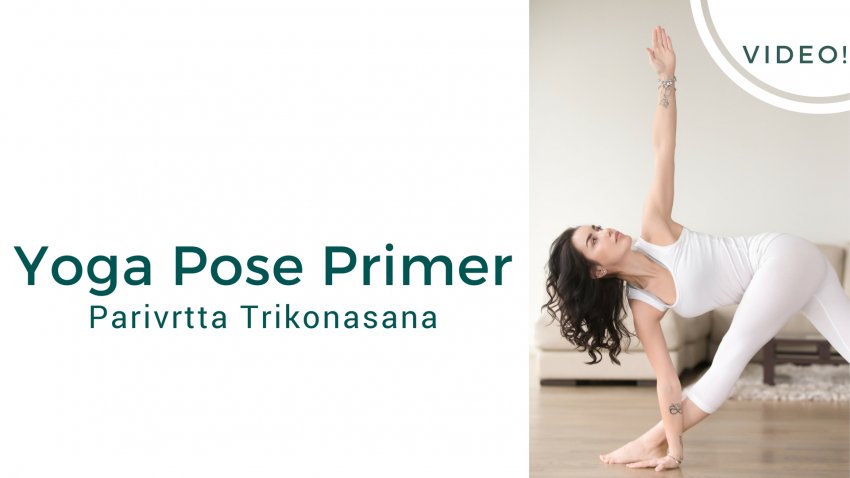
Yoga Teaching & Practice: Parivrtta Trikonasana (Revolved Triangle Pose) - Tuthorial Yoga Video
Every yoga pose is challenging in its own way, and Parivrrta Trikonasana (Revolved Triangle Pose) is no exception. There are so many points of action and alignment to think about, but they all come together to create a truly beautiful yoga pose that activates the entire body. Revolved Triangle is a challenging pose, so you want to make sure you are warm before starting. Check out the free online yoga video tutorial below to learn more.
Benefits of Parivrrta Trikonasana (Revolved Triangle Pose)
Parivrrta Trikonasana strengthens and stretches the legs and hips, and elongates the spine and arms. It is one of the more challenging and deeper twisting poses, which makes it more difficult to access for many beginning yoga students.
However, if you stick with it, Revolved Triangle pose is likely to quickly become one of your favorite go-to yoga poses. Over time, Parivrrta Trikonasana greatly improves twisting range of motion, which in turn can help open the thoracic spine and chest.
1. Building Correct Alignment in Revolved Triangle Pose
In the yoga video tutorial above, YogaUOnline’s Jasmine Punzalan shows how to move into Parivrrta Trikonasana with correct alignment by transitioning through Parsvottanasana (also known as Intense Side Stretch, or Pyramid Pose).
2. The Setup for Revolved Triangle Pose
Start with two blocks at the top of your yoga mat. Stand with feet shoulder-width apart right behind the yoga blocks. Step the left foot back behind you about 3.5 feet.
Note: Contrary to what you may think, if you are TIGHTER, go LONGER in your stance for this pose. That’s right: the less flexible you are in your legs and back the further apart you need to place your feet.
Now that you are standing with your right foot in front of your left, “square-off” the shoulders, hips, and ribcage toward the wall in front of you. To do this, you will need to draw your right shoulder, ribcage, and hip back, and the left hip, rib, and shoulder forward. Engage the sides of your belly button towards the spine.
3. Transition Pose: Parsvottanasana/Intense Side Stretch

While rooting down strongly through both feet, get long in your spine: imagine someone is pulling up on the top of your head. From this grounded and extended position, fold from the hips and place your hands on either block. Find length in the spine by pressing the shoulder blades into the spine.
Most of us tend to round in the upper back in Parsvottanasana; make sure to keep this part of the spine extended. Check in with the lower spine now: avoid overarching here by drawing the lower ribs up towards the spine.
Now check in again with the side waist and draw the right hip back more to create an even length in both sides of the body. As you reach the hips back, draw the chest forward.
4. Going Deeper: Lengthen the Spine
While still in Parsvottanasana, you can try walking the hands and blocks forward to create even more length in the upper body. Stay here and imprint the sensation of this length.
5. Transitioning to Parivrrta Trikonasana
 To transition from Parsvottanasana to Revolved Triangle Pose, walk the hands back underneath you and come to standing. Keep rooting down through the feet and place your right thumb in the hip crease of your front right leg.
Lift your left arm up. Keep lengthening through the spine as you hinge from the hips: reach the hips back and the chest forward. Place your left hand on the block just outside the front right foot (find the height of the block that is appropriate for you).
6. Refining Alignment in Revolved Triangle Pose
Once again, the key to alignment in Parivrrta Trikonasana is to first find as much length in the spine as you can. Root into the back heel and reach the chest forward away from your hips.
Keeping the ribcage moving forward, twist through the spine. You can either place the hand on your back hip or try extending the fingers up towards the ceiling. With every inhale move the ribcage away from your hips. With every exhale, twist a little more.
7. Moving Out of Parivrrta Trikonasana
Reach the top arm back behind you and down towards the floor like you’re doing a backstroke. Look down at the floor and get steady. Now circle your opposite arm up and overhead as you rise to standing, facing the side wall. Parallel your feet with hands on your hips, and step or lightly hop the feet together.
Rinse and Repeat
Follow these same steps to come into Revolved Triangle pose on the other side to balance out the body.
Modifications for Revolved Triangle Pose
Parivritta Trikonasana is a very challenging yoga posture, and few beginning yoga students will be able to get into the full pose right away. Fortunately, it is also a pose that is fairly easy to modify.
To find the right expression of the pose for your body, try these modifications, listed in order of increasing challenge.
a. Instead of placing the block on the outside of the front foot, place the block in the highest setting on the inside of the front foot, so the block is about hip distance from the front foot.
b. As you come into the pose, if needed to create a full twisting motion, bend the front knee and allow the back heel to come off the floor.
c. Once you’re comfortable with this modification of Parivritta Trikonasana, add the following steps: Lower the back heel to the floor, and if possible, straighten the front leg.
d. If you’re still fine with this variation of Revolved Triangle, lower the block to medium or low to increase the challenge level.
e. If that still feels comfortable, begin to experiment with putting the block on the outside of the front foot: First on the highest setting, and then lowering one step at a time.
Somewhere along the way, you will begin to feel your spinal alignment suffer, the back rounding, and your arm no longer reaching effortlessly towards the ceiling.
Once this happens, it means you’ve gone beyond what is a comfortable variation of Revolved Triangle for you body. Go back to the variation before and stick with that for a while before you again begin to experiment with more challenging variations of Parivritta Trikonasana. Remember, it’s not about how far you are able to get into a pose, but rather if you’re able to do it retaining the grace and beauty of the pose while staying steady and comfortable.
Ad box
Like what you saw in this video? Watch the full class when you join the Practice Channel!
Featured Courses

While millions of Americans suffer from pain in the low back and pelvis, many back and hip issues are actually the result of sacroiliac instability (SI), i.e. an imbalance in the sacroiliac joint, which often goes undiagnosed or is improperly treated. Alarmingly, yoga practitioners appear to...Read more

Hip openers are among the most satisfying and powerful yoga poses. They hold a tremendous potential for transformation; they can help us release deep-seated tension and trauma of the past, which many of us hold locked in the hip area. When practiced correctly, hip openers are a great way to soothe...Read more

Yoga is more popular than ever, but as yoga has become a household word, has it also become a mile wide and an inch deep? Are we missing out on the essence of yoga, even as the practice has become a household word? What can we do to capture the deepest aspects of yoga and integrate these into our...Read more
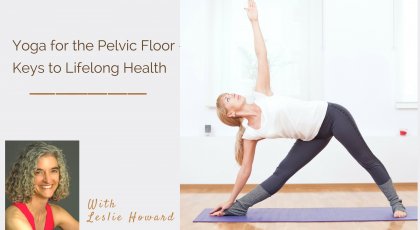
Most people know the importance of core strengthening for health and long-term well-being, but the pelvic floor is an important group of core muscles, which tend to get ignored. “The torso is like a tote bag for your organs,” says Leslie Howard, a Bay area yoga teacher who conducts workshops...Read more
More Articles

Make Peace with Your Least Favorite Yoga Poses
So you’ve already looked around, noticed that other people enjoy poses you hate and accepted the possibility that you might come to like those poses too. You’ve gazed deep into the eyes of your least favorite... Read more
Nurture Your SI Joint in Yoga Practice
In a recent article , we explored how hormonal fluctuations, pregnancy and postpartum challenges, recurring asymmetrical activity, and sports injuries can lead to sacroiliac joint (SI joint) dysfunction and... Read more
The 5 Layers of Self-Awareness
For centuries, philosophers have pondered the connection between mental and physical health. Science now recognizes the mind/body connection. Research continues to find evidence that our thoughts, feelings,... Read more
5 Yoga Poses for Shoulder Joint Health
The shoulder is the most mobile joint in the human body. Technically called the glenohumeral joint, the shoulder is where the humerus (upper arm bone) meets the glenoid fossa (a small indent in the scapula or... Read more